Vivado IP Integrator Setup#
Table of Contents#
Overview#
This document assumes you have cloned the developer kit and sourced the hdk_setup.sh. It is highly recommended that you get familiar with the HDK development flow by following the step-by-step quick start guide for customer hardware development prior to using the Vivado IP Integrator (IPI).
After you become familiar with building an example AFI and running it on F2 instances, refer to IP Integrator Quick Start Examples documentation for help with example designs, new designs, and additional tutorials.
Installation in Linux#
Using a text editor, open either ~/.Xilinx/Vivado/init.tcl or
~/.Xilinx/Vivado/Vivado_init.tcl. If neither files exists, run the
following command to create one under ~/.Xilinx/Vivado/.
touch Vivado_init.tcl
To get the absolute path of $HDK_SHELL_DIR , use this command:
echo $HDK_SHELL_DIR
NOTE: If your $HDK_SHELL_DIR is empty or does not display when
echoed, you need to source the hdk_setup.sh.
In init.tcl or Vivado_init.tcl, append the following lines based
upon the $HDK_SHELL_DIR path to the end of the file.
set shell small_shell
source $::env(HDK_SHELL_DIR)/hlx/hlx_setup.tcl
NOTE: A shell variable must be specified for the flow to pair
the customer design with the correct shell variant. Valid values are
xdma_shell (coming soon) or small_shell.
Switching between HDK and HLx flows#
Vivado automatically sources either
~/.Xilinx/Vivado/init.tclor~/.Xilinx/Vivado/Vivado_init.tclat startup. After completing the setup steps above, the IPI features will load automatically each time you launch Vivado.To switch back to the HDK flow, please remove the
source $::env(HDK_SHELL_DIR)/hlx/hlx_setup.tclline from yourinit.tclorVivado_init.tclfile.
Vivado Overview#
This section provides a basic overview of the Vivado GUI. The GUI environment enables developers of all experience levels to:
Quickly set project options and strategies to meet design requirements
Access interactive reports and design views
Efficiently resolve timing and area issues
The IP Integrator (IPI) is a design entry tool in the Vivado HLx Design Suite. It allows developers to connect IPs at a block level and generates ‘what you see is what you get’ RTL files in either VHDL or Verilog format. The IPI flow enhances the standard RTL flow by providing designer assistance features, including:
Simplified connectivity of IPs through interface-based connections
Block automation that adds helper IPs (such as interconnects, DMAs, and other support blocks) based on IP configuration
Connectivity automation for routing interfaces, clocks, and resets between blocks
Design Rule Checks (DRCs) for ensuring proper interface connectivity and clock domain crossing
Advanced hardware debug capabilities enabling transaction-level debugging
For detailed information and design methodology guidelines, refer to the following documentation:
To open the GUI, run command vivado. After Vivado loads, create an
empty project by selecting Create New Project and following the
prompts until you see a blank canvas. The sections below describe the
tabs and menus, refer to the screenshot below. Exploring these tabs and
menus in your blank project is encouraged.
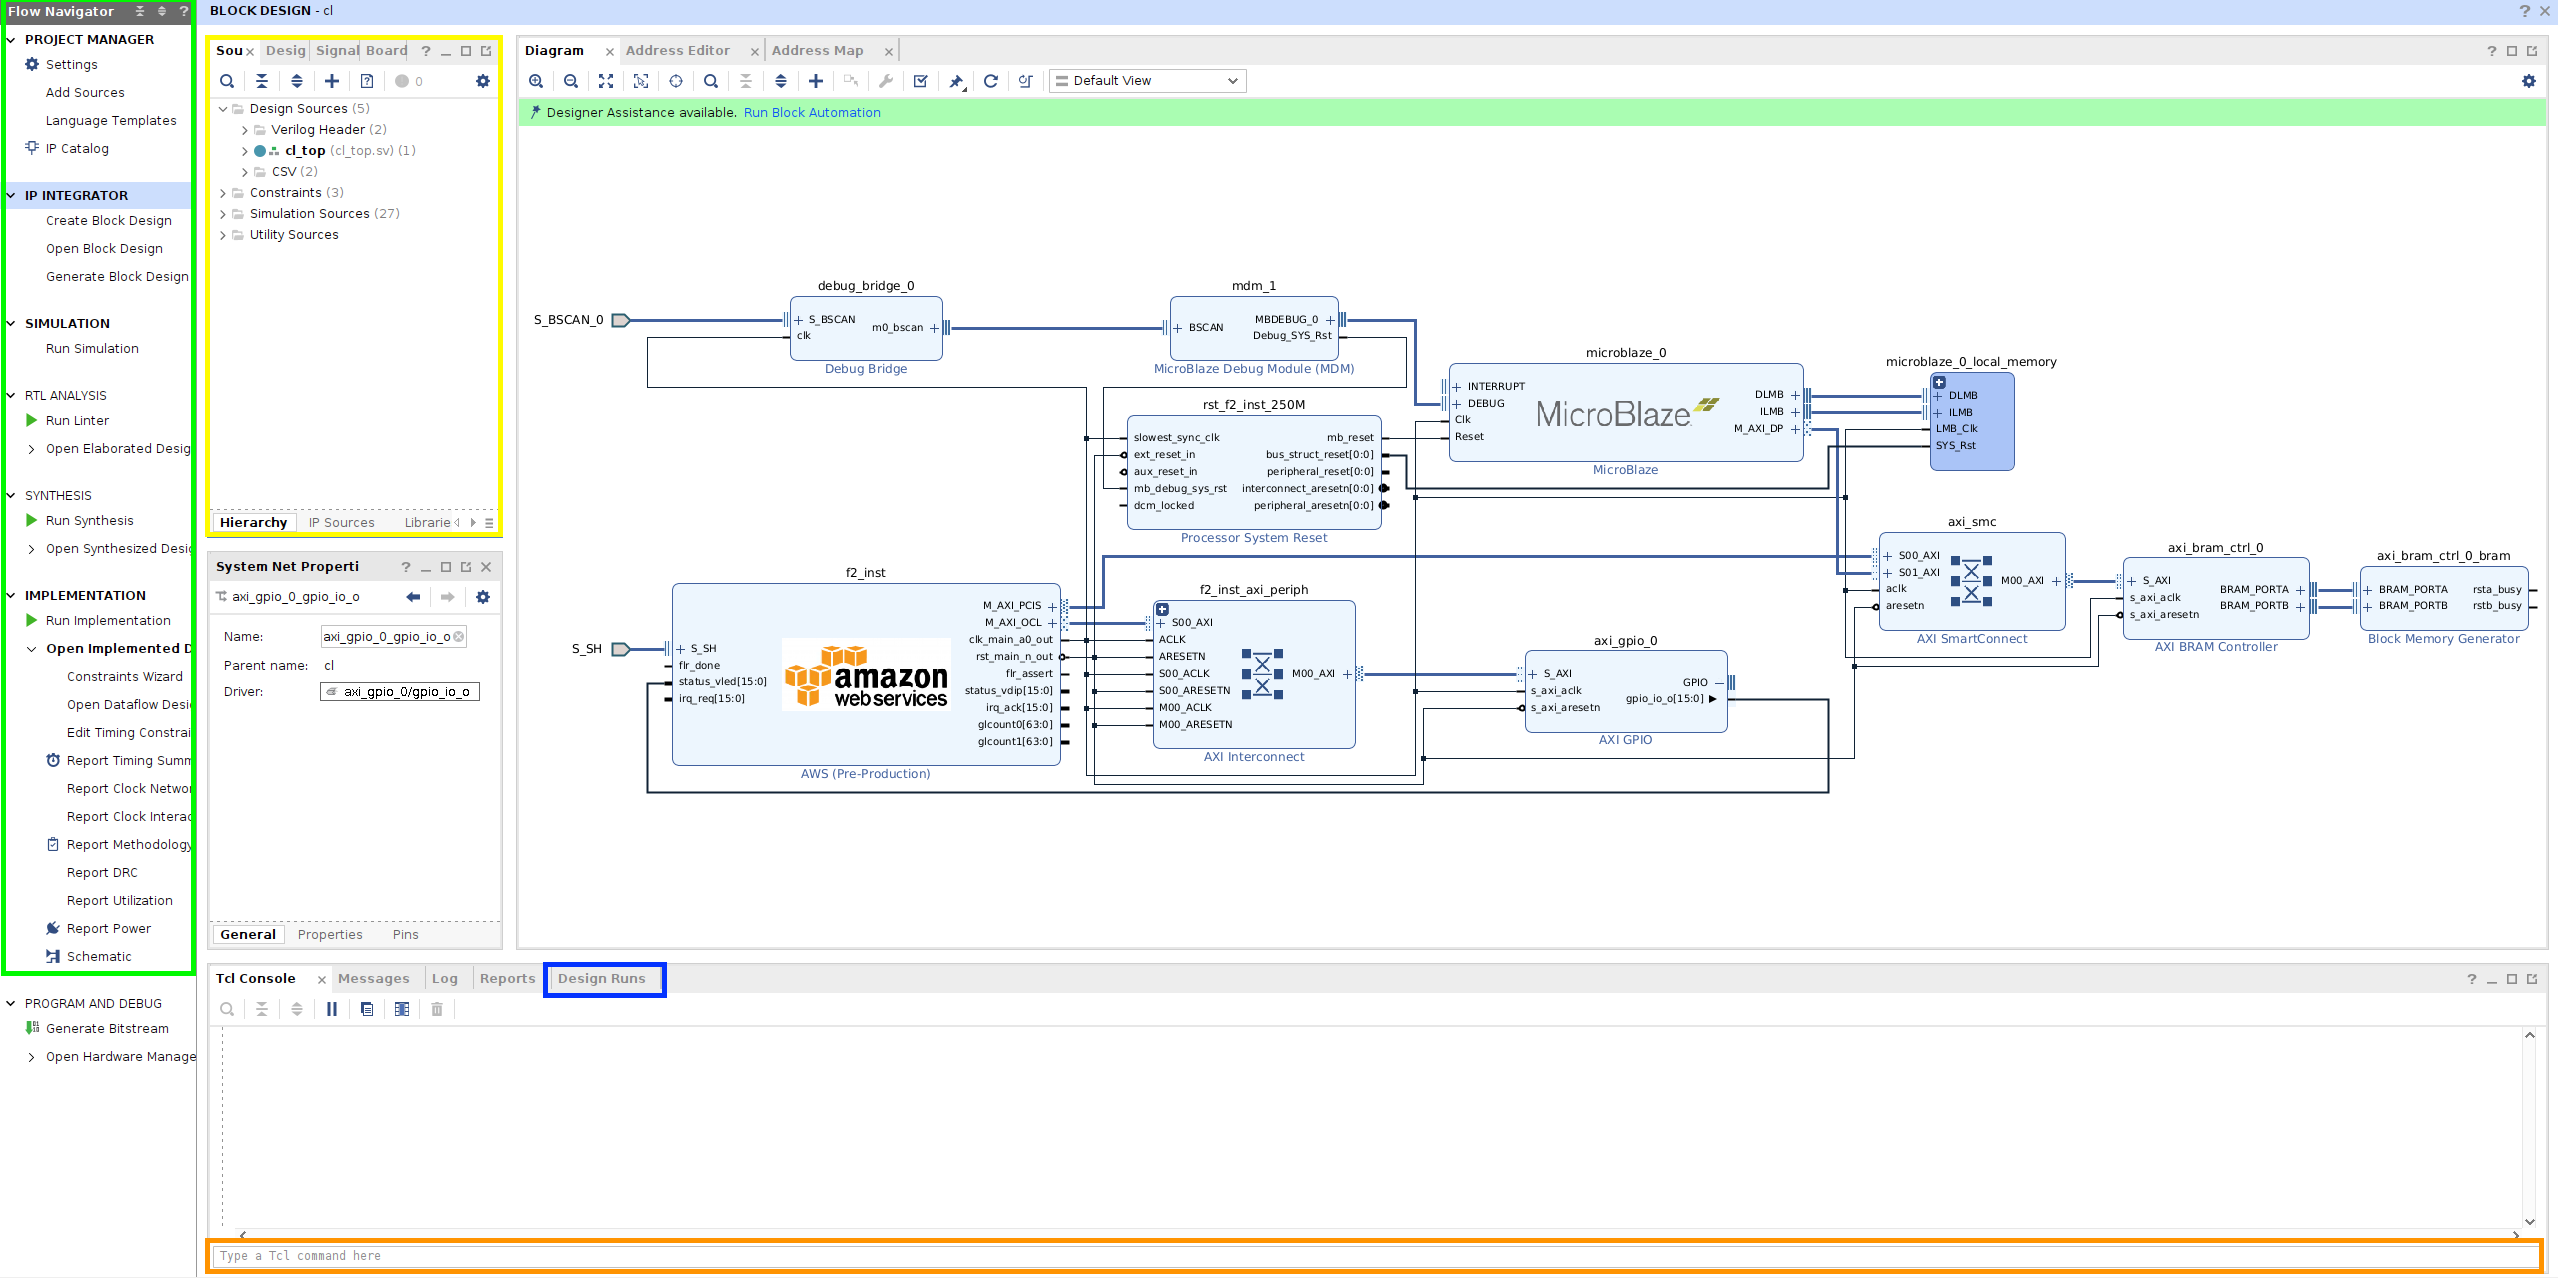
Diagram#
Sources Tab#
The box in yellow contains the design sources.
Hierarchy Tab#
The ‘Sources’ tab is divided into three different categories.
Design Sources: contains synthesis/implementation sources
Constraints: contains timing constraint (XDC) files
Simulation Sources: contains simulation-only sources
Clicking on a file displays its information in the ‘Properties’ tab (under ‘Sources’). In this tab, you can specify how the file is used in the design flow:
RTL/IP sources are typically marked for:
Synthesis, implementation, simulation
Synthesis, implementation
Simulation
XDC files are typically marked for:
Synthesis, implementation
Synthesis
Implementation
IP Sources Tab#
When an IP is added to your project, the ‘IP Sources’ tab becomes visible. This tab contains imported IP sources.
TCL Commands#
The orange box is where you enter Tcl commands. The ‘Tcl Console’ tab above displays the command outputs.
Design Runs Tab#
The ‘Design Runs’ are located in the blue box. This area provides functionality similar to the ‘SYNTHESIS’ and ‘IMPLEMENTATION’ sections in the ‘Flow Navigator’. The examples and tutorials demonstrate how to use ‘synth_1’ and ‘impl_1’ runs to build your design.
Vivado Flows Overview#
The Vivado HLx environment supports IP Integrator (IPI) flow. This section provides a top-level overview of these flows. For detailed information, see HLx GUI Flows with Vivado IP Integrator.
IP Integration flow#
You can easily create a full design by adding Vivado IP to the block diagram. Use RTL module referencing to add custom RTL as IP to the block diagram. This flow supports both RTL and IP additions as IP blocks. Find examples in the IP Integrator Quick Start Examples.
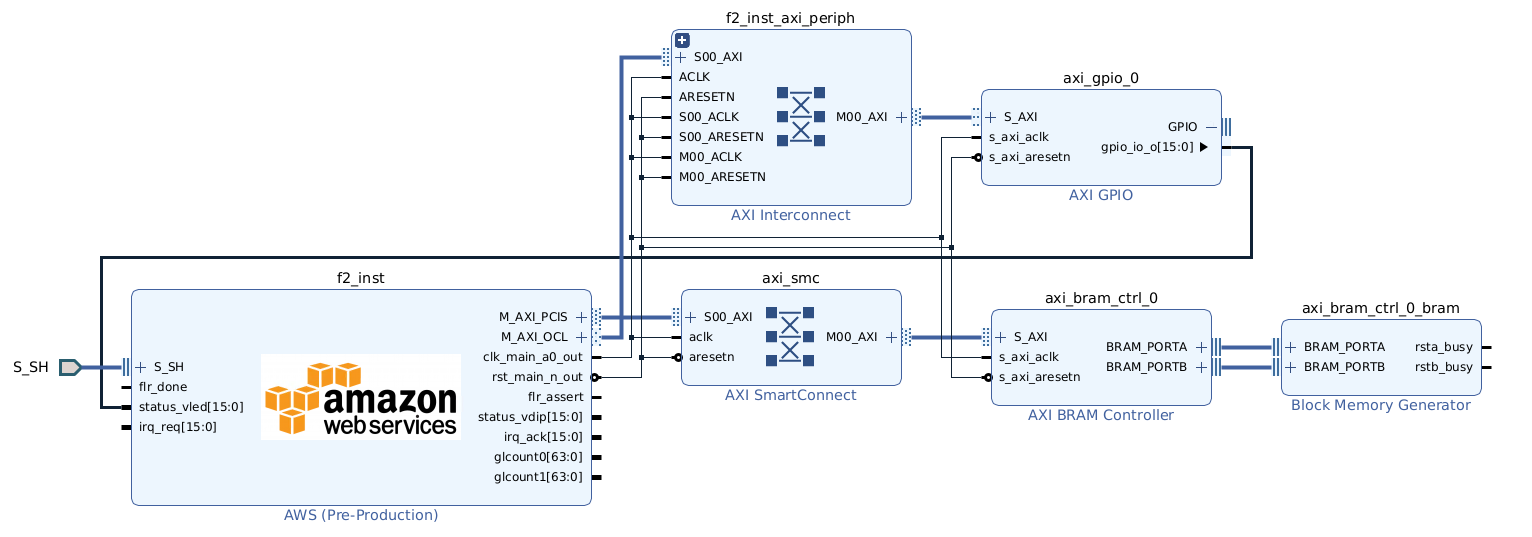
Diagram#
General Environment#
Design Constraints in Project#
Top-level clocks from the Shell are provided for synthesis in:
cl_clocks_aws.xdc – Top-level clock constraints for the CL
The following files are available for adding custom constraints:
cl_synth_user.xdc – User synthesis constraints
cl_pnr_user.xdc – User timing and floorplanning constraints
Synthesis/Implementation#
By default, synthesis is using the Default directive and all
implementation steps are using the Explore directive.
To modify implementation settings, right-click ‘IMPLEMENTATION’, click ‘Implementation Settings…’ and selection the ‘Implementation’ option in ‘Project Settings’. Modify directives only for
opt_design
place_design
phys_opt_design
route_design
NOTE: Do not change the Strategy option, as this will override HLx
environment settings.
For getting started, refer to IP Integrator Quick Start Examples.
Next Steps#
Review the AWS IP documentation to familiarize yourself with shell features available in the IPI environment.
Proceed to the IPI Quick Start Examples for guidance on creating example designs, developing new designs and following additional tutorials.